Sunday, July 10, 2011

Migrating XenApp 5 to XenApp 6

Scenario

Prerequisites
  1. Upgrade Citrix License Server version to 11.6.1 Build 10007 or latest -
     
    Citrix License Server 11.6.1 has had three iterations: Build 9019, Build 9020, and Build 10007, all of which can be used to support XenApp 6. Citrix Strongly recommends that the latest release, Build 10007, be used because it incorporates a new dashboard and administrative functionality.

    The latest Citrix License Server is not based on IIS or Java, thus an in-place upgrade of an existing Citrix License Server has no new prerequisites. Prior to upgrading, ensure upgrade eligibility by confirming the Citrix License Server version currently in use. To do so, access the following location in the registry:

    HKEY_LOCAL_MACHINE\SOFTWARE\Citrix\LicenseServer\Install.

     
  2. Datastore database can only be based on SQL Server 2005/2008, SQL Server Express 2008 or Oracle.
     
  3. XenApp Hotfix Rollup Pack 5 (HRP5) OR higher Rollup Pack (HRP6) must be installed on XenApp 5 servers in order to migrate to XenApp 6.
Things to remember
  1. It is not possible to upgrade XenApp 5 servers to XenApp 6 servers, even if XenApp 5 is installed on Windows Server 2008 R2 x64. So you have to install XenApp 6 on a new Windows 2008 R2 server with a new Farm name and then migrate all settings from existing XenApp 5 farm to the new XenApp 6 farm.
     
  2. Mixed farms (for example, XenApp 4 farm and XenApp 5 farm) are not supported in XenApp 6.
    This is because XenApp 6 supports Worker Group and the Worker Group data are stored in the Datastore. XenApp 5 has no provision for this, so Citrix decided to discontinue with Mixed farm support.
     
  3. XenApp 6 Migration Tool can be used ot export settings from the XenApp 5 farm and import into new XenApp 6 farm. Specifically, the following items are not transferred:
  4. Zone Preference and Failover policy within XenApp 5 is converted to a load balancing policy in XenApp 6. If you have already implemented additional zones in order to configure failover, whereas XenApp 6 addresses this more efficiently through Worker Groups. As such, zone settings are not transferred.
     
  5. The originating farm from which settings are pulled can only be based on XenApp 5 for Windows Server 2003 HRP5 or XenApp 5 for Windows Server 2008. Some or all settings can then be transferred via the command line tool. If the existing farm is based on server or application folders, these settings can be exported so that they will be identified as Worker Groups within the new farm. Additional command line entries are available to include, exclude, or modify specific settings. The administrator must have full administrative rights within the XenApp 6 farm.
     
  6. Prior to initiating the migration of settings, Worker Groups should be designated so that server and application silos can be assigned appropriately. This provides administrators with additional flexibility and enables a significant number of new servers to be added to the new XenApp 6 farm at once using a tool such as Citrix Provisioning services.
Installing XenApp 6 Migration Tool
  1. Download XenApp 6 Migration Tool from HERE. Login with your Citrix username and password and then download the tool. 
  2. uj
Steps to transfer all farm settings via the XenApp 6 Migration Tool

Post-migration steps

Saturday, July 2, 2011

Installing EdgeSight Server on Windows Server 2003

Scenario
  • Database Server: SQL 2005
  • Database Server Host Name: Citrix
  • Database Authentication Mode: Windows Authentication
  • EdgeSight Server Host Name: XenApp2
Note:
  • Do not install EdgeSight on XenApp Server. If you do so, you will get the following error:

     
  • Disable Internet Explorer Enhanced Security Configuration.

Installation of Prerequisites
  1. Install IIS.
  2. Install Dot Net 3.5 SP1.
  3. Report Server must be configured on SQL Server.
  4. Install Adobe Flash Player (not mandatory, but required for viewing reports).
  5. Install MSMQ (Message Queuing Services).
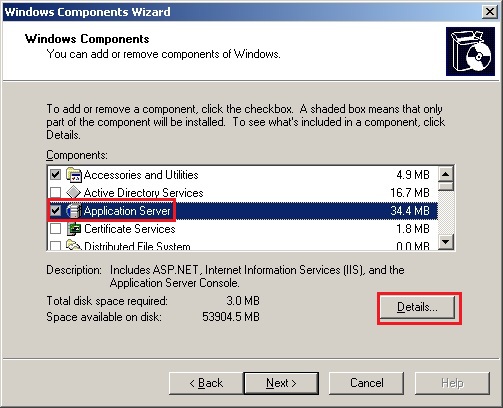
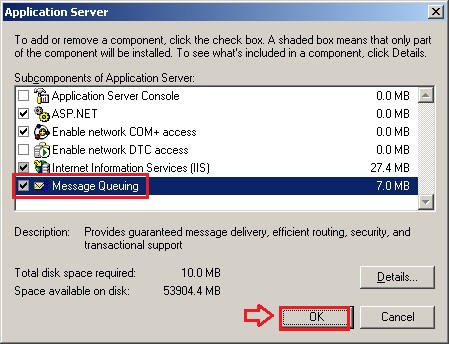
To install MSMQ on Windows 2003 Server, follow the below-mentioned procedures:

(i) Open Windows Control Panel --> Add/Remove Programs --> Windows Components.

(ii) Click on Application Server and then click on Details.
 

(iii) Select Message Queuing. Click OK to proceed with the installation.

    Installation of EdgeSight server
    1. Insert XenApp 6 media, open Autorun and go to Manually Install Component --> Server Components --> Application Performance Monitoring --> EdgeSight Server.

       
    2. Select the language and then click on Continue.

       
    3. Click on Next.

       
    4. Select EdgeSight Server Website and Database and then click Next.

       
    5. Here you will get status of each prerequisite. If you missed anything, it will be indicated here and you have to install that prerequisite and then run the setup again. If you have all the default prerequisites installed, it will show as passed. Click on Next in that case.

       
    6. Accept the License Agreement and click Next.

       
    7. Select Custom and then click Next.

       
    8. I am using existing SQL database. To connect to the database select Choose an existing database server and then select the database server name (here my database server name is Citrix).

      Select the authentication mode. I have selected Windows Authentication based on my database authentication mode.

      Click on Test Connect to check the connectivity status with the databse. On successful connection with the database it will show the message as "Connection successful".

      Click Next.


    9. Enter the database name in Install a new EdgeSight Database text box and then click Next.
    10. Enter the domain credentials as DOMAIN\User Name format and then click on Validte button.


    11. Select the File Group Size, Log File Size and Recovery Model Options and then click on Next.
    12. Select the Program Files Root and Data Files Path. Click Next. The default paths are as below:

      Program Files Root
      C:\Program Files\Citrix\System Monitoring\Server\EdgeSight\

      Data Files Path
      C:\Program Files\Citrix\System Monitoring\Server\EdgeSight\Data\

    13. Click Install to begin the installation.


    14. Click Finish. This will launch initial configuration wizard.
    15. Enter the domain credentials to access the site. Click OK.
    16. The site will open. Click Next.
    17. Enter the Company Name, Time Zone and select the language. Click Next.
    18. Enter the Super User details. This user will have full access to EdgeSight server database. Click Next.
    19. Enter the following details as per you company data and click Next.
    20. Select the options, put the EdgeSight License Server Name and port. Click Test to test the connection with the EdgeSight license server. Once successfully connected, click on Next.


      The license server needs to be v4.5 or higher. If you have platinum XenApp you can use the Basic And Advanced Agents. If you have Advanced or Enterprise you can only use the Basic clients unless you have specifically bought Advanced EdgeSight Agent licenses.


      Note you do not actually need to get these details right to click next, so if your license server is not ready (or will never be ready and you are just building a temporary server) you can continue in the grace period for 14 days. You will get a message on every screen in EdgeSight saying there is a problem with the license server until valid details are entered.
       
    21. Review the entire settings you configured. Once confirmed click Finish.
    22. Enter the Super User credentials in the following page and click Logon.
    23. Enter the report server URL and credentials to access the database server. Click Save Changes.
    24. Go to Operations tab and then select the checkbox Load Reports. Click on Execute button to upload the EdgeSight report on the database server.


      On successful upload, you will get the message "Configuration completed successfully". Click Close.
    25. To check to status open the URL http://<database server name>/ReportServer. Here I have opened http://Citrix/ReportServer.
    Installing EdgeSight agent for XenApp
    1. Run the EdgeSight Agent installer.
       
    2. Click Next.

       
    3. Accept the license agreement and click Next.

       
    4. Enter the Company name. Click Next.

       
    5. Click Next.

       
    6. Enter the EdgeSight server name in the Server Name field (here my EdgeSight server name is XenApp2) and then click Next.

       
    7. Click Install to begin the installation.

       
    8. Click Finish.

       
    9. Click Yes to restart the server.

    Tuesday, June 28, 2011

    Only administrators have permission to add, remove or configure server software during a Terminal services remote session.

    When you are installing software on a Terminal Server, getting the following error though you have proper Administrative rights on that Terminal Server. You are unable to proceed with installation.

    "Only administrators have permission to add, remove or configure server software during a Terminal services remote session. If you want to install or configure software on the server, contact your local Administrator."


    Resolution
    Add the following registry entry on the server:

    HKEY_LOCAL_MACHINE \Software \Policies \Microsoft \Windows \Installer

    Value name: EnableAdminTSRemote

    Date Type: REG_DWORD

    Value data: 1

    Base: Hexadecimal

    Sunday, June 26, 2011

    PowerShell: Retrieving Citrix server names that are having a paricular software installed

    I want to list the Citrix server names on which Acrobat Reader X installed. Following PowerShell script is helpful for that. This script will store the server list in a log file as well as display the server list in the console.

    cls
    Add-PSSnapin Citrix.XenApp.Commands


    ##########################################
    # Declaring a log file to store the result
    ##########################################

    $log_file = 'C:\InstalledServers.txt'
    Clear-Content $log_file


    #########################
    # Getting list of Citrix servers
    #########################
    $servers = Get-XAServer

    #######################
    # Storing result in the log fle
    #######################

    ECHO "List of Servers having Adobe Reader X installed" >> $log_file
    ECHO "************************************************" >> $log_file


    Write-Host "List of Servers having Adobe Reader X installed"
    foreach($server in $servers)
    {
     $colItems = get-wmiobject -class "Win32_Product" -namespace "root\CIMV2" -ComputerName $server | where-object { $_.Caption -eq 'Adobe Reader X' }
     

    $colItems.__SERVER >> $log_file
     write-host $colItems.__SERVER
    }

    PowerShell: Getting list of installed softwares from remote computer

    Following PowerShell script can be used to retrieve list installed softwares from a remote server.

    cls
    $strComputer = "<put server name here>"

    $AllItems = get-wmiobject -class "Win32_Product" -namespace "root\CIMV2" -computername $strComputer

    foreach ($objItem in $AllItems)
    {
        write-host "Caption: " $objItem.Caption
        write-host "Description: " $objItem.Description
        write-host "Identifying Number: " $objItem.IdentifyingNumber
        write-host "Installation Date: " $objItem.InstallDate
        write-host "Installation Date 2: " $objItem.InstallDate2
        write-host "Installation Location: " $objItem.InstallLocation
        write-host "Installation State: " $objItem.InstallState
        write-host "Name: " $objItem.Name
        write-host "Package Cache: " $objItem.PackageCache
        write-host "SKU Number: " $objItem.SKUNumber
        write-host "Vendor: " $objItem.Vendor
        write-host "Version: " $objItem.Version
        write-host
    }

    Citrix: Deploying Acrobat Reader X (Version 10) using Citrix Installation Manager

    Using Installation Manager you can deploy Acrobat Reader X to all of your Citrix servers using the following procedures.
    1. Dowonlaod full standalole package of Acrobat Reader X (Version 10) from HERE.
       
    2. Download Adobe Customization Wizard X from HERE.
    3. Install Adobe Customization Wizard X on the server - accecpt all defaults.
       
    4. Extract the Acrobat Reader X exe using the following command:

      AdbeRdr1000_en_US -nos_ne


    5. Wait for the window that pops up to do its work.
       
    6. Once extraction is complete, go to the following path to check the extracted folder. You will get the folder Adobe. The Acroread.msi file can be found inside that folder.

      C:\Documents and Settings\All Users\Application Data


    7. Now open Adobe Customization Wizard X.
       
    8. Click on File --> Open and open the AcroRead.msi file.
       
    9. Go to EULA and click on Suppress Display of End User License Agreement (EULA).


    10. Click on Online and Acrobat.com Features and select Disable all updates and Disable all Acrobat.com access, including initiation and participation check boxes.


    11. Save the package from File --> Save Package.


    12. It will create two extra files in the same folder of AcroRead.msi. These two files are:

      AcroRead.mst
      AcroRead.ref


    13. Copy all the files inside that folder. Create a shared folder and paste there.


    14. Now open Citrix XenApp Advanced Configuration. Go to Installation Manager --> Packages. Right click on it and select Add Package.


    15. Select AcroRead.msi from the shared path by clicking on the Browse button and then enter the Package Name. click OK.


    16. Click No.


    17. Click OK on the confirmation message.
       
    18. Right click on the package name you have created and then click on Install Package.


    19. Add the server(s) on which you want to deploy that package and then click on Next.
       
    20. Click Finish to deploy the package immediately.


    21. On successful deployment you will get the status as Success in the Citrix Access Management Console.